If you're editing a video in iMovie on a Mac and wonder how to save your progress, you're not alone. iMovie doesn't have a traditional "Save" button like other apps, which can be confusing at first. The good news is that it auto-saves your work — but there are still a few key ways to make sure your edits are safe, and your final video is stored exactly how you want. Whether you just want to keep working without worry or export your finished project as a video file, here's how to do it.
How to Save iMovie Project on Mac?
Auto-Save: iMovie Saves as You Go
The first thing to understand is that iMovie on Mac auto-saves your project as you're working. You don't have to manually click "Save" to preserve your edits. Every time you trim a clip, add music or move something on the timeline, iMovie stores that change automatically.
Your project is stored in a special area within the iMovie Library. You’ll find this Library in your Movies folder by default. When you open iMovie and look at the "Projects" screen, everything listed there is stored in that library file — that includes all your edits, imported media, transitions, effects, and more.
If your iMovie or Mac crashes, usually, you can just open the app, and your project will be where you had left off. But don't depend on that alone. There are still methods to ensure your work is stored securely and playable on various devices or backups.
Manually Backing Up Your iMovie Library
Auto-save is convenient, but what happens if your computer fails? To be safe, you can manually back up your iMovie Library. First, quit iMovie to make sure everything is properly saved. Then open Finder, go to your Movies folder, and find a file called iMovie Library.imovielibrary. That’s your entire iMovie universe in one place.
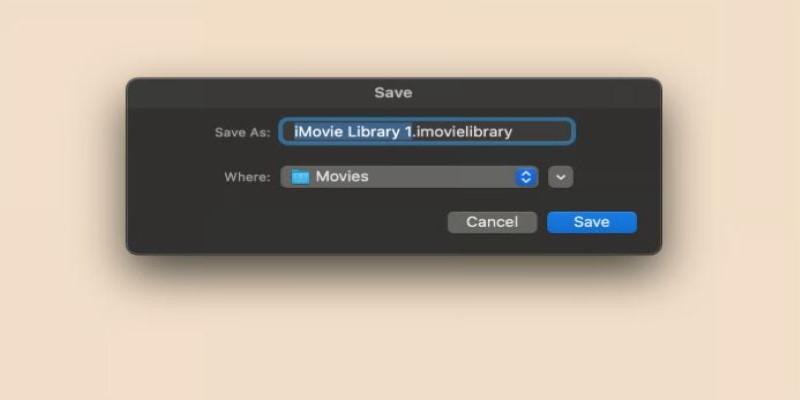
You can copy this file to an external drive or a USB stick or even upload it to a cloud storage service like iCloud Drive or Google Drive (if your file size allows). Just keep in mind that if your project includes large video files, the library file can get pretty big. Some cloud services may take a while to upload everything. To restore a backup later, just move the library file back into the Movies folder and open it with iMovie. You’ll see your projects just like you left them.
Saving an iMovie Project as a File on Your Mac
There’s a big difference between saving your project and exporting your final video. Once you're done editing and want to have a playable video file you can watch outside iMovie, you’ll need to export or “share” your project.
Here’s how:
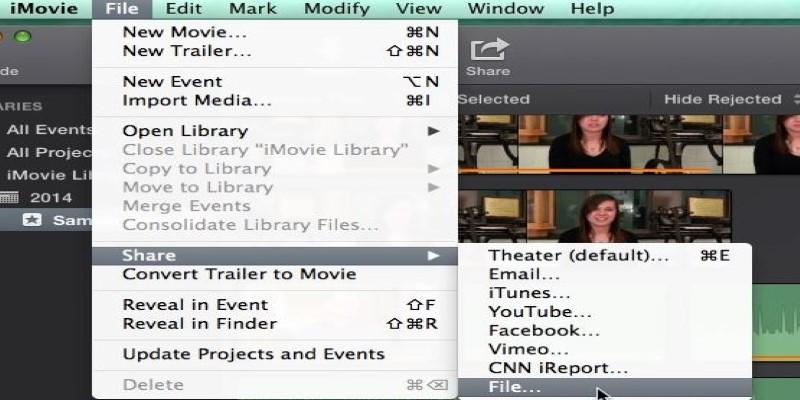
- Open your project in iMovie.
- Click the Share button in the top right corner of the window (it looks like a square with an arrow pointing up).
- Choose File from the options. This is the best choice if you want a video file saved directly to your Mac.
- Set your resolution, quality, and compression settings.
- Click Next, then choose where to save the file.
- Hit Save. iMovie will render and export the video. Once it’s done, you’ll have a standalone movie file (.mp4 or .mov) you can keep, copy, or upload wherever you like.
This exported file doesn’t replace your project — it’s just a copy of your finished video. You can keep editing your project inside iMovie even after exporting and save new versions later.
Saving to an External Drive
If you’re working on a project that’s eating up a lot of disk space, or you want to move between Macs, you can save your iMovie project directly onto an external drive.
First, make sure the drive is formatted as Mac OS Extended (Journaled). If it's not, reformat it using Disk Utility (note: this erases everything on the drive).
Next, move your iMovie Library to the drive:
- Quit iMovie.
- Open Finder and go to your Movies folder.
- Drag the iMovie Library.imovielibrary file to your external drive.
- Once it’s finished copying, double-click it to open in iMovie.
iMovie will now use the library on your external drive instead of the local one. You can edit directly from the drive or copy it back later.
Exporting a Project for Sharing
Once your video is ready to be shared with friends and clients or posted online, you'll want to export it in a shareable format.
You can use the Share > File method described earlier or choose YouTube, Facebook, or Email if you want iMovie to handle the upload for you. That said, exporting to a file and uploading separately gives you more control.
Choose a resolution based on your needs — 1080p is usually fine for most purposes, and 4K is available if your source footage supports it. You can also set quality to “High” or “Best” depending on how much storage space you want to use.
Conclusion
Saving a project in iMovie on your Mac is simple once you understand how it works. The app saves changes automatically, so you don’t need to think about hitting save every few minutes. But if you want to back up your progress or export your final video, knowing where your files are and how to create a video copy makes all the difference. With just a few steps, you can protect your work and share it however you like. You don’t need to be tech-savvy — just knowing where the iMovie Library is and how to export a video file covers most situations. If you're working on something important or time-consuming, saving a copy to an external drive can give you peace of mind.