When you're putting together a video project, the audio matters just as much as the visuals. Whether it's background music, a voiceover, or a sound effect, getting the audio right can change how your video feels. iMovie, Apple's entry-level video editing software, makes it pretty easy to bring in your audio and trim it down to fit your project.
Even if you're using an older version like iMovie 7 or something newer like iMovie 11 or 10, the steps are mostly similar, with slight differences in the layout or terminology. This guide walks you through how to import and trim audio in multiple versions of iMovie—starting from iMovie 11 and going back to iMovie 7.
How to Import and Trim Audio in iMovie 11/10/9/8/7
Import and Trim Videos Using iMovie 11
If you're using iMovie 11, things are fairly streamlined. Once your project is open, importing audio is as simple as dragging and dropping. But there are other ways, too.
You can go to the music note icon on the right side of the window, which opens the Media Browser. From there, you can browse your iTunes library, GarageBand tracks, or other audio saved on your Mac. Find the track you want, then drag it into your project timeline. You can place it as a background track—this appears as a green bar underneath the video—or as a clip attached to a specific part of the video.
Trimming audio in iMovie 11 is direct. Just click on the edge of the audio clip and drag it inward to shorten it. If you want more control, right-click the audio and select "Trim Clip." A yellow trim bar will show up where you can adjust the beginning or end. You can also split audio by placing the played at a specific point, right-clicking, and choosing “Split Clip.”
Import and Trim Videos Using iMovie 10
iMovie 10 has a similar feel to iMovie 11 but has changed a few things around the interface. To import audio, open the "Audio" tab above the browser. This lets you access your iTunes library, GarageBand, or files stored on your Mac. You can search for the track or scroll until you find it. Once you do, drag it to the timeline—either under the entire project as a background track or right below a specific clip to sync it more tightly.

Trimming in iMovie 10 is similar to iMovie 11. Drag the edge of the audio clip inward to cut it shorter, or split the clip using Command + B when the play head is at the right spot. If you need to fine-tune the trimming, click on the audio clip and use the clip trimmer by selecting “Modify” in the menu bar and choosing “Trim to Playhead” or opening the “Clip Trimmer” for more detailed edits.
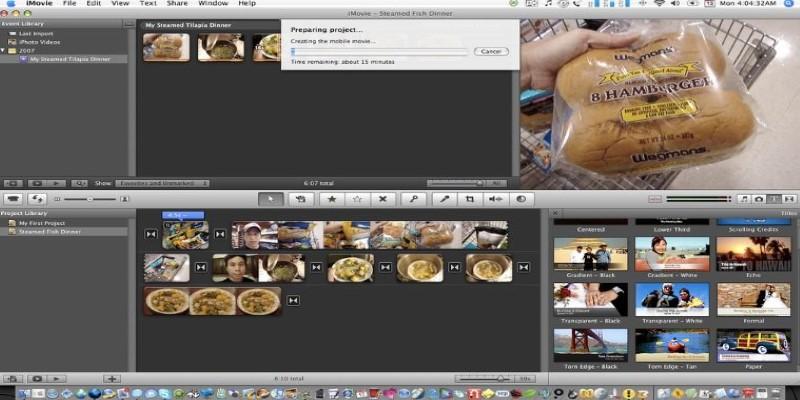
Import and Trim Videos Using iMovie 9
Things were a bit more simplified in iMovie 9. To import audio, you’d first click on the “Music and Sound Effects” button, which opens a side browser. This gives you access to iTunes, GarageBand, and pre-loaded sound effects. Like later versions, dragging the audio into the timeline drops it right where you want it.
If you want to use a file that isn't in iTunes or GarageBand, you'll need to import it first. Go to "File" > "Import" > "Movies" or "Music," depending on the format, and find your audio file.
Once your audio is in the timeline, trimming is straightforward. You can click and drag the ends of the clip to cut it down. For more precise cuts, move the play head to the exact spot, right-click the clip, and select “Split Clip.” This lets you remove or move parts of the audio without affecting the whole thing.
Import and Trim Videos Using iMovie 8
In iMovie 8, importing audio is a little more manual. There's no dedicated audio panel like in the newer versions. Instead, you’ll go to the “Music and Sound Effects” section, which is found in the toolbar, and browse your iTunes or GarageBand library. Dragging a track into the project timeline works the same as always—drop it where you want it.
If your audio file is saved outside iTunes or GarageBand, you need to bring it in using “File” > “Import.” After that, it shows up in the Event Library, where you can use it like any other media clip.
Trimming works the same way. You’ll see yellow handles at both ends of the audio clip once it’s selected. Drag these handles to trim. If you want to split the clip, position the playhead, right-click, and choose the split option.
Keep in mind that iMovie 8 can be a bit touchier when it comes to syncing audio. It helps to zoom in on the timeline using the slider below the project to make sure your trims are lining up correctly with the video.
Import and Trim Videos Using iMovie 7
With iMovie 7, things feel a bit older—because they are. The interface is more basic, but it still gets the job done. To bring in audio, you’ll use the “Media” tab. Inside that, click “Audio” to browse your iTunes or GarageBand collection. Drag your audio into the timeline where you want it to start.
If you have a custom audio file, import it using the “Import” command under the “File” menu. Once imported, it’ll appear in your clips library. From there, you can drag it into the project just like you would a video clip.
To trim audio, click on the clip in the timeline. You can drag the ends to shorten it or use the play head to find the point where you want to cut. Then go to the "Edit" menu and select "Split Clip." It's not as fluid as the later versions, but it works just as well with a little patience.
Conclusion
Whether you're working with iMovie 11 or going way back to iMovie 7, bringing in and trimming audio is something you can learn quickly. The core steps are mostly the same—import your file, drop it into the timeline, trim the ends, and make any cuts or adjustments you need. Each version has its quirks, but none of them are too difficult once you get the hang of it. If your goal is to make your video feel more polished or emotionally in tune with the visuals, trimming the audio just right can make a big difference. It doesn't take long to learn, and once you do, it becomes second nature. Don't worry about getting it perfect on the first try—just keep experimenting, and the process will get easier every time.